Introduction
The following example is a more complex version of dynamic setting of remote JobSchedulers. It is just an extension of the basic principle, that is described in:
Description
This example differs from the basic one because, while in the simple example we are configuring one order per remote host (and port), here we are configuring one order with one parameter. The value of that parameter is then the list of hosts (with the corresponding ports, where JobScheduler is running on) where the order will be running on.
Example of scheduler.remote_scheduler
A scheduler.remote_scheduler example has been prepared and can be used to set up a remote scheduling demonstration.
To run the example you need at least three JobSchedulers, one of which is to be used as the 'main' JobScheduler and the others as the remote ones.
Note that scheduler.remote_scheduler only works when both the main and remote JobSchedulers are version 1.7 or newer.
The Job
A Job that processes the parameter in the order and split the value in order to be able to use the defined hosts and ports. This is an API job and is defined as follows:
function spooler_process() \{

    var remote_scheduler_list = String(spooler_task.order.params.value("remote_scheduler_list"));
    var parameters = spooler_task.order.params;
    if( parameters.count > 0 )  \{
       spooler_log.info( "Parameters given" );
    \} else \{
           spooler_log.info( " no Parameters given" );
           \}

	    spooler_log.info( " remote_scheduler_list : " + remote_scheduler_list );
	    var valuePart = remote_scheduler_list.split(",");
        spooler_log.info(" valuePart.length :" + valuePart.length)

    	for ( var i = 0; i < valuePart.length; i++) \{
	       spooler_log.info( " valuePart : "  + valuePart[i]);
    	    var order = spooler.create_order();
    	   	var variable_set = spooler.create_variable_set();
 	        variable_set.set_var("scheduler.remote_scheduler", valuePart[i]);

            spooler_log.info(variable_set);

           order.params = variable_set;
           var order_secs = 10 * i;
           spooler_log.info( " order_secs : "  + order_secs);
           order.at = "now+10";
	       spooler.job_chain( "MY_JOB_CHAIN").add_order( order );
      	\}

    return true;
\}
The Job Chain
This is a simple JobChain just using the Job defined above.
The Order
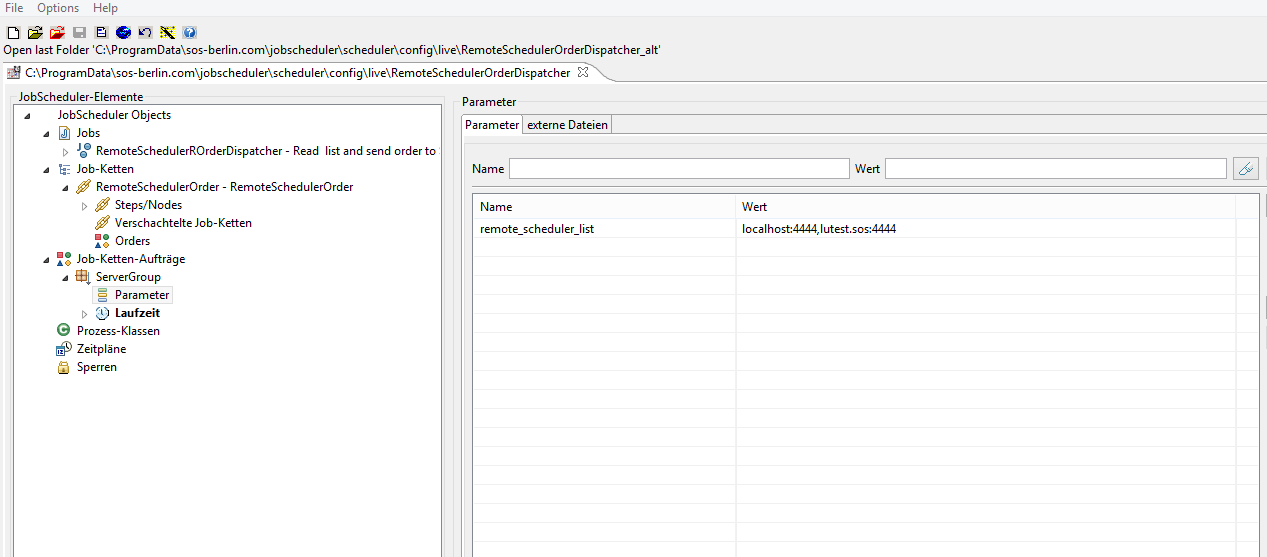
The order is the same as defined in the basic example. The difference resides in the definition of the parameter. Instead of just one host and one port pro order, you can define a list of hosts and ports separated by comma as follows:
These objects can be seen in the following screenshot from JOE:
{{DiagramBox | BoxTitlh1. Remote Scheduler Parameter List | BoxContent
}}
Configuring the example in your environment
There are just two things that you should configure to make this example run in your environment:
- The Job: In the last line "MY_JOB_CHAIN" is the name of the Job Chain you want to send the orders to (in the main JobScheduler).
for ( var i = 0; i < valuePart.length; i++) \{
	       spooler_log.info( " valuePart : "  + valuePart[i]);
    	    var order = spooler.create_order();
    	   	var variable_set = spooler.create_variable_set();
 	        variable_set.set_var("scheduler.remote_scheduler", valuePart[i]);

            spooler_log.info(variable_set);

           order.params = variable_set;
           var order_secs = 10 * i;
           spooler_log.info( " order_secs : "  + order_secs);
           order.at = "now+10";
	       spooler.job_chain( "MY_JOB_CHAIN").add_order( order );
      	\}
- The Order Parameters: you can configure this in JOE. Alternatively, the list of hosts and ports can be edited in the XML file
RemoteSchedulerOrder,ServerGroup.order.xml:
 <params>
          <param name="scheduler.remote_scheduler" value="HOST_1:PORT_1,HOST_2:PORT_2" />
 </params>
Download the example
To get the example ready to use, simply unpack the RemoteSchedulerOrderDispatcher.zip file into the 'live' folder of the 'main' JobScheduler that will be controlling the remote one(s).
