Environment
This article describes the use of the JobScheduler Universal Agent batch installer/updater in a homogeneous environment. We define a homogeneous environment as one in which a number of JobScheduler Agents will be installed based on the same prerequisites:
- A JobScheduler Master is up and running.
- The Agent installations are to be performed on any number of servers that have the same operating system. One Agent is to be installed per server.
- The Agents will be operated with the same user, listening port and installation path.
The Batch Installer supports:
- First Installation: an Agent has not yet been installed on the server.
- Update Installation: an Agent has already been installed and optionally up and running.
Operation of th Batch Installer/Updater Structure
The JobScheduler Agents will be installed by a JobScheduler Master that:
- connects to the Servers that the Agents are to be installed on and
- executes the corresponding Agent installations.
The Installer / Updater structure is made up of a JobScheduler AgentBatchInstaller job and a JobScheduler universal_agent_installer job chain. The AgentBatchInstaller job is responsible for creating the JobScheduler orders for the job chain. Each of these orders is named according to the pattern <host>:<port> to convey the host and port of the server where the respective Agent is to be installed.
The universal_agent_installer job chain has four job nodes configured in series as follows:
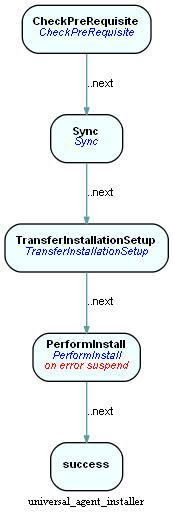
The individual nodes in the universal_agent_installer job chain have the following functions:
CheckPreRequisiteSync:To wait until all prerequisites have been checked and any already installed Agent instances that are running have been shut down.- Check for the correct Java version.
- Check whether a JobScheduler Universal Agent has already been installed. If so:
- shut down the instance if it is running,
- remove the installation.
- shut down the instance if it is running,
TransferInstallationSetup: To transfer the installer files to the host- Before the transfer starts, the preprocessor will use the use the
jobscheduler_agent_instance_script.txttemplate to create a start script for the Agent instance. The files that are to be transfered are specified with the element
<globals><transfer><file_spec=".*\.(sh|gz)$">- This regular expression is used to, the following files will be transfered:
- the JobScheduler Universal Agent installation files:
jobscheduler_unix_universal_agent.tar.gz
thejobscheduler_agent_<port>.shstart script for the instance - the installation script:
jobscheduler_universal_agent_install.sh
- the JobScheduler Universal Agent installation files:
- Before the transfer starts, the preprocessor will use the use the
PerformInstall: The installation is started by SSH.The step before transfered installation script will be executed
- The installation script will install and start the JobScheduler Universal Agent
- Finally the PerformInstall job post-processing commands will be executed:
- These commands are specified using the
<installation><postprocessing><command>element.
- The default configuration for a Linux server will place the Agent start script under
/etc/init.dand set up the autostart for JobScheduler Universal Agent(example for a Ubuntu distribution):echo ${ssh.sudo_password} | sudo -S cp ${install_path}/jobscheduler_agent/bin/jobscheduler_agent_${agent_options.scheduler_http_port}.sh /etc/init.d/jobscheduler_agent_${agent_options.scheduler_http_port}echo ${ssh.sudo_password} | sudo -Supdate-rc.d jobscheduler_agent_${agent_options.scheduler_http_port} defaults
- These commands are specified using the
Download
The following steps have to be carried out. Files can be downloaded from http://www.sos-berlin.com/jobscheduler-downloads
- Unix
- Download the "JobScheduler Universal Agent" tarball for Unix.
- Download the "JobScheduler Universal Agent Batch Installer" for Unix. The archive contains the following:
- a
config/live/batch_installer_agentfolder, with the jobs and job chains that are to be extracted to thelivefolder of the JobScheduler Master:${SCHEDULER_DATA}/config/live. - a
config/batch_installerfolder containing configuration files for the Batch Installer. These files should be extracted to theconfigdirectory of the JobScheduler Master:$SCHEDULER_DATA/config.
- a
- Copy the JobScheduler Universal Agent installation file to the
${SCHEDULER_DATA}/config/batch_installerfolder.
- Windows
- Download the "JobScheduler Universal Agent" for Windows.
- Download the "JobScheduler Universal Agent Batch Installer" for Windows. The archive provides the following content:
- the
config/live/batch_installer_agentfolder contains jobs and job chains that should be extracted to thelivefolder of the JobScheduler Master${SCHEDULER_DATA}/config/live. - the
config/batch_installerfolder contains configuration files for the Batch Installer that should be extracted to the JobScheduler configuration directory${SCHEDULER_DATA}/config. - Copy the JobScheduler Universal Agent installation file to the folder
${SCHEDULER_DATA}/config/batch_installer.
- the
Configuration
XML files
- Configuring XML files with a text editor is error-prone. Therefore we recommend that you download the XML Editor that can be used to manage the configuration files required for the Batch Installer. For details about the XML Editor see the Using the XML Editor chapter below.
- After downloading the XML Editor, extract the contents of the zip file to a convenient folder (an installation routine is not required) and start the
sos.xml.editor.exeprogram. - Open your
batch_installer_config_file.xmlconfiguration file in the XML Editor and assign thescheduler_universal_agent_installations.xsdschema: both files are located in theconfig/batch_installerfolder. - Open your
yade_agent_batch_installer_settings.xmlYADE configurationconfig/batch_installerfolder and assign the XSD schema
- After downloading the XML Editor, extract the contents of the zip file to a convenient folder (an installation routine is not required) and start the
- See the Batch Installer Configuration File chapter below for instructions on how to configure the Batch Installer configuration file
- See the YADE profiles for the file transfer chapter below for instructions on how to configure the YADE configuration file
Hints
- The XML Editor is available for Windows.
- YADE is an Open Source file transfer solution for FTP, SFTP, FTPS, WebDAV and other protocols. Concretely, it will be used here for transferring the following files from the JobScheduler Master to the Agent servers:
- JobScheduler Universal Agent installation files:
jobscheduler_unix_universal_agent.1.11.0-SNAPSHOT.tar.gz - Start script for an Agent instance:
jobscheduler_agent_<port>.sh - Installation script:
jobscheduler_universal_agent_install.sh
- JobScheduler Universal Agent installation files:
- For more information about YADE, see the YADE product site.
JobScheduler Jobs
AgentBatchInstallerjob: adjust the parameter values for theAgentBatchInstallerjob in your JobScheduler Master.Adjust the
installation_definition_filejob parameter with the path that points to the Batch Installer configuration file.
Installation of the Agents
The Agents can be installed after the XML configuration files and JobScheduler jobs have been configured. Start a task for the AgentBatchInstaller job as follows:
- Open a JobScheduler Operating Center (JOC) browser window for the JobScheduler master.
- Right click on the job to open the context menu.
- Select the
Start task immediatelyoperation. - This job will create the appropriate JobScheduler orders as explained in the chapter and the Agent installation.
Example: Installation of two Agents
The following example describes the installation of two Agents on separate servers.
Batch Installer Configuration File
We assume that you have opened the Batch Installer configuration file batch_installer_config_file.xml and assigned the scheduler_universal_agent_installations.xsd XSD schema. The XML file contains a basic example with recommended values for an Agent installation.
The Batch Installer configuration file contains an <installation> element for each Agent instance. In addition, the <global> element can be used in a homogeneous environment to specify parameters that will be applied to all Agent installations. If a parameter is specified in the <global> element and in an individual <installation> element then the setting for the individual element will overwrite the global setting.
The following configuration steps should be carried out:
- Global parameters:
- Specify the
<install_path>to point to a location where the Agent should be installed. - Specify the path to the YADE settings file (.ini file) in the Batch Installer configuration file with the element
<globals><transfer><settings>. - Specify the credentials for the SSH connection:
<user>: SSH login user<password>: Password for the login user<sudo_password>: Password forsudoactions- <
auth_method>: SSH authentication method <port>: SSH port
- Specify the post-processing commands that fit your operating system on the Agent server with the
<postprocessing>element. The default commands will place the Agent start script under/etc/init.dand will setup the autostart for JobScheduler Universal Agent on a Linux server (example for an Ubuntu distribution):echo ${ssh.sudo_password} | sudo -S cp ${install_path}/jobscheduler_agent/bin/jobscheduler_agent_${agent_options.scheduler_http_port}.sh /etc/init.d/jobscheduler_agent_${agent_options.scheduler_http_port}echo ${ssh.sudo_password} | sudo -Supdate-rc.d jobscheduler_agent_${agent_options.scheduler_http_port} defaults
- Specify the
- Installation parameters (specified for each Agent installation):
- Agent options:
<scheduler_user>: Agent user<scheduler_log_dir>: Logs folder for the Agent
- SSH Host
- Agent options:
Post-processing commands
- The SSH login user has to become
rootin order to execute these commands. Therefore the SSH login user should be included tosudoers. - These two commands will be executed by the job node
PerformInstall, the last job node in the job chain. If you want to add more commands, please add the call on the job node. - Note that the values for the elements defined in the Batch Installer configuration file can be used for the postprocessing commands, for instance:
${install_path}: the value for the element<install_path>${agent_options.scheduler_http_port}: the value for the element<scheduler_http_port>. If not defined, the default value (4445 in this case) is taken, like in the example below.
An example Batch Installer configuration file for the installation of two Agents might look like this:
Hints
- Note that the port specified with the parameter
<scheduler_http_port>is not specified with the element<installations><installation><agent_options>. This configuration causes the global value4445to be applied to all Agent installations. - For a homogeneous environment parameters can be specified with the
<global>element and are applied to all Agent installations.
YADE Configuration File for File Transfer
You should have opened your YADE configuration file yade_agent_batch_installer_settings.xml and have assigned the XSD schema http://www.sos-berlin.com/schema/yade/YADE_configuration_v1.0.xsd. The XML file contains a basic example with recommended values for an Agent installation (of only one Agent).
Each installation makes use of a profile in the YADE configuration file. The default profile name is <host>:<port> where
<host>will be substituted with the value from the element<installation><agent_option><scheduler_ip_address><port>will be substituted with the value from the element<installation><agent_option><scheduler_http_port>
Please follow these steps:
- Add a
<ProtocolFragments>element and nodes for each host that you want to install the Agent for. The best way to add another<ProtocolFragments>element using the XML Editor is copying the element and pasting it to the element above<Fragments>. - Add a
<Profile>element and nodes for each host that you want to install the Agent for. The best way to add another<Profile>element using the XML Editor is copying the element and pasting it to the element above<Profiles>. - The default
profile_idis<host>:<port>. If you do not use the default then you have to specify the profile name in the Batch Installer configuration file.
An example for the Batch Installer configuration file for the installation of two Agents might look like this:
YADE Settings File for File Transfer
Note that the file shown above is an XML file and YADE will expect an .ini file to perform the transfer that is specified with the Batch Installer configuration file in the element <globals><install_path><transfer><settings>.
- It is recommended to use the XML Editor to convert configuration files from XML to .ini format (see below chapter XML Editor for converting YADE configuration files (XML) into YADE setting files (.ini))
- Find the following example of an .ini file that has been converted from the above XML file:
Using the XML Editor
The XML Editor can be used to manage the Batch Installer configuration file and the YADE configuration file.
XML Editor for Batch Installer configuration file
An example for a Batch Installer configuration file where one Agent installation is defined looks like this:

XML Editor for YADE configuration file
An example for a YADE configuration file where one Agent installation is defined looks like this:

XML Editor for converting YADE configuration files (XML) into YADE setting files (.ini)
For converting YADE files from a XML format to an .ini format you have the option "YADE Xml2Ini Converter" in your XML Editor. The next screen will look like this:

Regarding the Batch Installer it is not necessary to create a Profile, since the conversion takes place one time once the "Autotransform" option has been chosen. Every time a change in the XML file is saved the file will be automatically converted to the .ini file.
A pop-up window will show every time a change is saved, if the option "Show notification on autotransform" is chosen.