...
- First Installation: no Agent is installed and running on the server.
- Update Installation: an Agent is installed and optionally up and running.
...
Structure
The following steps have to be carried out. Files can be downloaded from http://www.sos-berlin.com/jobscheduler-downloads
- Unix
- Download the "JobScheduler Universal Agent" tarball for Unix.
- Download the "JobScheduler Universal Agent Batch Installer" for Unix. The archive provides the following content:
- the
config/live/batch_installer_agentfolder contains jobs and job chains that should be extracted to thelivefolder of the JobScheduler Master. - the
config/batch_installerfolder contains configuration files for the Batch Installer that should be extracted to the JobScheduler configuration directory. - Copy the JobScheduler Universal Agent installation file to the folder
config/batch_installerand rename the Agent installation file tojobscheduler_unix_universal_agent.tar.gz.
- the
- Windows
- Download the "JobScheduler Universal Agent" for Windows.
- Download the "JobScheduler Universal Agent Batch Installer" for Windows. The archive provides the following content:
- the
config/live/batch_installer_agentfolder contains jobs and job chains that should be extracted to thelivefolder of the JobScheduler Master. - the
config/batch_installerfolder contains configuration files for the Batch Installer that should be extracted to the JobScheduler configuration directory. - Copy the JobScheduler Universal Agent installation file to the folder
config/batch_installerand rename the Agent installation file tojobscheduler_unix_universal_agent.tar.gz.
- the
Configuration
XML files
...
- After download of the XML Editor extract the zip file, then start the program
sos.xml.editor.exe. - Open your Batch Installer configuration file
batch_installer_config_file.xmland assign the XSD schemascheduler_universal_agent_installations.xsd,both files are located in the folderconfig/batch_installer. - Open your YADE configuration file
yade_agent_batch_installer_settings.xmlthat is located in the folderconfig/batch_installerand assign the XSD schema
...
Agents will be installed from a JobScheduler Master. There is a JobScheduler job responsible for creating the Orders, which are
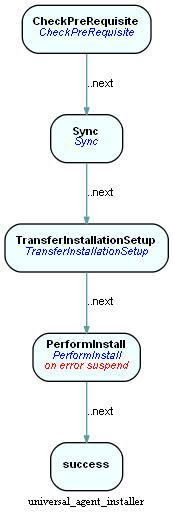
The job chain for update/installation of an Agent uses the nodes:
CheckPreRequisite- Checking for the correct Java version
- Checking whether JobScheduler Universal Agent already has been installed.
- If so
- shutting down a possibly running instance
- remove the installation
- If so
Sync:To wait until all prerequisites are checked and all instances have been shut down.TransferInstallationSetup: To transfer the installer files to the host- Before the transfer starts, the preprocessor will create the instance start script from the template
jobscheduler_agent_instance_script.txt The files that will be transfered are specified with the configuration element <globals><transfer><file_spec=".*\.(sh|gz)$">
- With this regular expression, the following files will be transfered:
- the JobScheduler Universal Agent installer files:
jobscheduler_unix_universal_agent.1.11.0-SNAPSHOT.tar.gz - the instance start script:
jobscheduler_agent_<port>.sh - the installation script:
jobscheduler_universal_agent_install.sh
- the JobScheduler Universal Agent installer files:
- Before the transfer starts, the preprocessor will create the instance start script from the template
PerformInstall: To start the installation using SSH.- The step before transfered installation script will be executed
- The installation script will install and start the JobScheduler Universal Agent
- Finally the postprocessing commands will be executed
- The postprocessing commands are stored with the element
<installation><postprocessing><command> - Three commands will be executed
- if you have more than three commands, please add the call in the job
PerformInstall
- if you have more than three commands, please add the call in the job
- The default commands will setup the autostart for JobScheduler Universal Agent on a Linux server (Ubuntu distribution)
echo ${ssh.sudo_password} | sudo -S cp ${install_path}/bin/jobscheduler_agent.sh /etc/init.d/jobschedulerecho ${ssh.sudo_password} | sudo -S update-rc.d jobscheduler defaults
- The postprocessing commands are stored with the element
Download
The following steps have to be carried out. Files can be downloaded from http://www.sos-berlin.com/jobscheduler-downloads
- Unix
- Download the "JobScheduler Universal Agent" tarball for Unix.
- Download the "JobScheduler Universal Agent Batch Installer" for Unix. The archive provides the following content:
- the
config/live/batch_installer_agentfolder contains jobs and job chains that should be extracted to thelivefolder of the JobScheduler Master${SCHEDULER_DATA}/config/live. - the
config/batch_installerfolder contains configuration files for the Batch Installer that should be extracted to theconfigdirectory of the JobScheduler Master${SCHEDULER_DATA}/config. - Copy the JobScheduler Universal Agent installation file to the folder
${SCHEDULER_DATA}/config/batch_installer.
- the
- Windows
- Download the "JobScheduler Universal Agent" for Windows.
- Download the "JobScheduler Universal Agent Batch Installer" for Windows. The archive provides the following content:
- the
config/live/batch_installer_agentfolder contains jobs and job chains that should be extracted to thelivefolder of the JobScheduler Master${SCHEDULER_DATA}/config/live. - the
config/batch_installerfolder contains configuration files for the Batch Installer that should be extracted to the JobScheduler configuration directory${SCHEDULER_DATA}/config. - Copy the JobScheduler Universal Agent installation file to the folder
${SCHEDULER_DATA}/config/batch_installer.
- the
Configuration
XML files
- Configuring XML files with a text editor is error-prone. Therefore we recommend that you download the XML Editor that can be used to manage the necessary configuration files for the Batch Installer. For details about the XML Editor see the below chapter Using the XML Editor.
- After download of the XML Editor extract the zip file, then start the program
sos.xml.editor.exe. - Open your Batch Installer configuration file
batch_installer_config_file.xmland assign the XSD schemascheduler_universal_agent_installations.xsd,both files are located in the folderconfig/batch_installer. - Open your YADE configuration file
yade_agent_batch_installer_settings.xmlthat is located in the folderconfig/batch_installerand assign the XSD schema
- After download of the XML Editor extract the zip file, then start the program
- For instructions how to configure the Batch Installer configuration file see the below chapter Batch Installer Configuration File.
- For instructions how to configure the YADE configuration file see the below chapter YADE profiles for the file transfer.
| Info | ||
|---|---|---|
| ||
|
...
| Info | ||
|---|---|---|
| ||
The XML Editor is available for Windows
|
JobScheduler Jobs
- Job
AgentBatchInstaller:Adjust the parameter values for theAgentBatchInstallerjob in your JobScheduler Master.Adjust the
installation_definition_filejob parameter with the path that points to the Batch Installer configuration file.
...
- Right click on the JobScheduler job
- From the context menu use the operation:
Start task immediately - This job will create different JobScheduler orders
- As many orders will be created as installations you have set for the JobChain
universal_agent_installer.job_chain.xmlresponsible for the Agent installations.
Example: Installation of two Agents
...