JobScheduler allows resources to be switched from one node to another as required by a cluster load balancer without interrupting the scheduling processes. This article describes the necessary configuration.
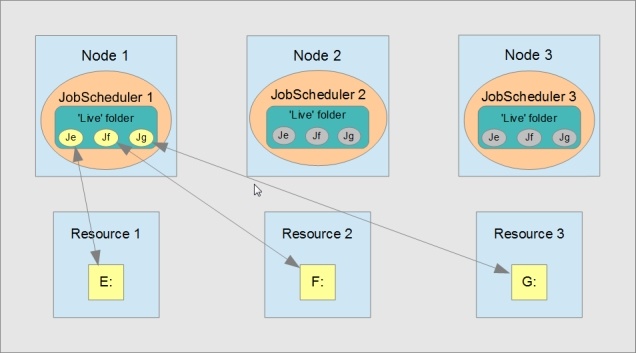
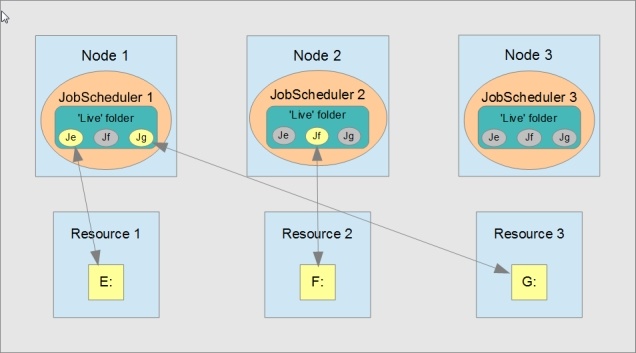
A typical application cluster would have a number of nodes (Node-1, Node-2, Node-3, etc.) and a number of resources (denoted by drive names E:, F:, G:, etc. on Windows systems) as shown in the diagrams below.
In the situation shown in the first diagram, the JobScheduler on Node 1 is processing objects on three resources.
- Initial situation: objects on all three resources being processed on Node 1.
If the cluster load balancer switches Resource 2 from Node 1 to Node 2 then the JobScheduler on Node 2 will start processing any objects on Resource 2 that are due. This is shown in the second diagram. Objects on Resource 2 that are being processed by the JobScheduler on Node 1 at the time Resource 2 is switched will be completed. It is not necessary to implement error handling or to take other measures to ensure a smooth transition from one node to another.
- Situation after switching: objects on Resource 2 now being processed on Node 2.
This continuous job scheduling is made possible by two JobScheduler features:
- JobScheduler stores its objects on the file system
- JobScheduler only processes objects that are on its file system – i.e. it 'forgets' files that are removed.
JobScheduler processes objects in its so-called “live” folder, shown in turquoise in the diagrams. In an application cluster, links or junctions to the resources available to the cluster are placed in the live folders of all the JobSchedulers in the cluster. These are represented in the diagrams by the small circles with a “J”. When a resource is made available to a node, the JobScheduler on that node will process objects from the live folder on the resource. Active junctions are coloured yellow in the diagrams.

